Did you know many homeowners in Canada struggle with their window cranks? This can cause problems and even safety risks. Total Home Windows & Doors, a well-known company in the Greater Toronto Area since 2007, has seen more people asking about fixing these issues.
Installing or adjusting a roto or crank handle on windows can be easy. We will show you how to do it. This way, your windows will work well and be safe.
Key Takeaways
- Understand the importance of proper window crank installation
- Learn the steps involved in installing window cranks
- Discover tips for maintaining your window cranks
- Identify common issues with window cranks and their solutions
- Explore the benefits of DIY window crank installation
Window and Doors Replacement Near Me
Understanding Window Cranks and Their Importance
Window cranks are key for casement windows to work right. They are the handle at the top of the window.
They make sure the window moves smoothly and stays shut tight. New window cranks have cool tech like Total Seal. This tech makes the window safer and keeps out weather.
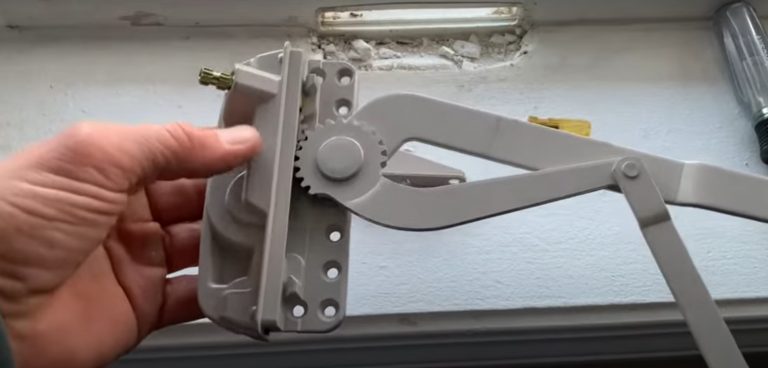
Knowing what makes up a window crank is important. It helps with fixing or replacing them. The main parts are the handle, gear system, and lock.
| Component | Description | Function |
|---|---|---|
| Handle | The part of the window crank that is grasped to operate the window. | Provides a means to open and close the window. |
| Gear System | The mechanism that translates the turning of the handle into window movement. | Facilitates the opening and closing of the casement window. |
| Locking Mechanism | A feature that secures the window in a closed position. | Enhances security and prevents unauthorized access. |
Knowing about window cranks helps homeowners. It makes them appreciate the need for correct installation and care. This ensures their windows work well and stay safe.
Find related services
Tools and Materials Needed for Window Crank Installation
Starting a DIY window crank installation needs the right tools and materials. You’ll need a flathead screwdriver and other basic tools for a smooth process.
For a 2- or 3-point locking system, like those in Total Home Windows & Doors, you might need extra parts. This includes locking mechanisms and handle assemblies. Make sure to check what your window needs to avoid delays.
Having all the tools and materials ready makes the job easier. This includes any special hardware for your window cranks, like screws, handles, or locks.
Explore energy-efficient options
Preparing for Window Crank Installation
Getting ready is crucial for a good window crank install. Make sure your area is set for the job.
Weather Considerations for Canadian Installations
Canada’s weather changes a lot, from cold winters to warm summers. It’s important to think about this when putting in window cranks. This makes sure they last a long time.
For example, UltraSlim Series windows need special care in bad weather. Here are some things to keep in mind:
| Weather Condition | Consideration | Action |
|---|---|---|
| Extreme Cold | Material flexibility | Handle with care to avoid damage |
| High Winds | Installation security | Ensure secure fastening |
| Rain | Waterproofing | Apply appropriate sealants |
Think about these points and use window crank installation tips for an easy window crank installation. For harder jobs, like UltraSlim Series windows, get expert advice.
Find the Best Window Styles for your Home
How to Install Window Cranks: Step-by-Step Process
At Total Home Windows & Doors, we know how important a good window crank is. It makes your windows work better. Installing one might seem hard, but we can help you do it easily.
First, make sure you have all the tools and parts you need. We talked about this earlier. We’ll show you how to install it right, so it works well and seals properly.
For a good seal, put the handle cover on and tighten the screw. Move the handle to make sure it works smoothly. “A well-installed window crank is crucial for the longevity and efficiency of your windows,” experts say.
Now, let’s get to the installation. Start by attaching the crank arm to the window sash. Make sure it’s tight. Then, put on the handle and secure it with a set screw.
Remember, precision and patience are key in this tutorial. By following these steps, you’ll get your window crank installed right. This will make your windows work better and last longer.
For detailed installation, always check the manufacturer’s guide. It will have specific tips for your window type. Our team at Total Home Windows & Doors is here to help and offer more advice.
Advanced Installation for High-Performance Windows
High-performance windows need special installation to work right. It’s key to know about the integrated lock point system.
Understanding the Integrated Lock Point System
The integrated lock point system keeps the window secure. It stops air leaks. When putting in window cranks, make sure they match this system for smooth use.
Optimizing the 2-3 Point Locking System
These windows have a 2- or 3-point locking system. This needs to be set up just right. It boosts security and energy saving.
| Feature | Description | Benefit |
|---|---|---|
| Total Seal technology | Prevents air leaks around the window | Improved energy efficiency |
| 2- or 3-point locking system | Secures the window at multiple points | Enhanced security and reduced air leakage |
| UltraSlim Series windows | Features a slimmer profile design | Increased natural light and aesthetic appeal |
Accommodating the 4-9/16" Frame Depth
Windows like the UltraSlim Series have a deeper frame. This needs careful measurement and planning for a good fit.
Handling the Slimmer Window Profile Design
The slim design looks great but needs careful handling. This keeps it looking sleek during installation.
By using these advanced installation methods, homeowners can make sure their windows work well. This means saving energy and staying safe for a long time.
Troubleshooting Common Window Crank Installation Issues
Installing a window crank is easy, but sometimes you need to fix problems. You might find handles that are loose, hard to move, or not in the right spot. This can happen even if you followed a detailed guide.
Let’s look at some common problems and how to fix them:
| Issue | Cause | Solution |
|---|---|---|
| Loose Handle | Loose or stripped screws | Tighten or replace screws |
| Hard-to-Operate Handle | Dirt or debris in mechanism | Clean the mechanism |
| Misaligned Handle | Improper installation | Realign the handle according to the manufacturer’s instructions |
A good DIY guide says, “Proper alignment and secure fastening are key to smooth operation.” Make sure everything is installed right and tightened well. This helps avoid many problems.
Knowing how to solve these issues helps homeowners fix their window crank installations. This way, they can work smoothly and well.
Maintaining Your Newly Installed Window Cranks
To keep your window cranks working well, regular care is key. Taking good care of them can make them last longer and work smoothly.
Keeping your window cranks clean is a simple step. Dirt and dust can make them stiff. Use a soft cloth and mild soap to clean them.
It’s also important to lubricate your window cranks. Use a silicone-based lubricant to make them move smoothly. Check them often for wear and fix any problems quickly.
By following these easy tips, your window cranks will work well for many years. Our guide helps you install them easily and enjoy smooth window operation.
Conclusion
Installing window cranks can be easy if you do it right. Just follow the steps in this guide. Homeowners can make their windows work better by themselves.
It’s key to install and keep window cranks well. At Total Home Windows & Doors, we stress using good materials and following the maker’s guide. This helps avoid problems.
With the right tools and a little patience, you can do it yourself. If you’re not sure, get help from a pro. This makes sure it’s done right.
By installing and keeping your window cranks right, you get better air flow. You also save energy and make your home more comfortable.